
State of the Art; Digital Images and Image Processing
Hayden Hamilton
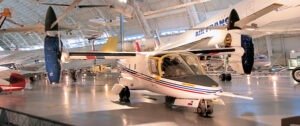
This Bell XV-15 is on display at the National Air and Space Museum’s Udvar-Hazy Center in Chantilly, Virginia. The plane is located close to the outer wall with aircraft to its immediate right and left. The photographer is left with this view being about the only one that provides a full view of the aircraft. The original images of this composite were shot with a 25mm lens. (Photos by Hayden Hamilton)
State of the Art; Digital Images and Image Processing
Remember back in the days of film how you would toss out images that were somehow flawed – for example, the back of someone’s head that managed to get into the picture at just the wrong time? Or that really rare bird that everyone was flocking around and you ended up having to take that “less than perfect” shot with a couple of people standing in frame? Or, a setting like a museum where unless you had an ultra-wide-angle lens, you just couldn’t get a shot of the complete aircraft? The frustration of getting your prints or slides back and finding the anomalies in some of your great shots if only . . .
And, if you didn’t toss these pictures, you still have the opportunity to salvage them by scanning them to create a digital copy.
With digital imaging and technology available today, we no longer have to settle for tossing these images. With imaging software like Photoshop Elements, Photoshop, Paint Shop Pro, or other sophisticated packages, you can now “correct” these situations. The following are before and after examples of the types of image editing that is possible to accomplish today with various degrees of experience required.
Most photo editing applications provide the user with basic tools to crop and manipulate the image density and intensity – similar to what we did when we were making prints from our film. The primary difference is that you can quickly fine tune the settings to get the desired results without having to expose and develop the print, repeating this process until you got everything the way you wanted. These features are probably the most frequently used aspect of the software and some of the most basic editing tools.
In the case of photo “stitching,” you really only need the tool. The software figures out how to put the multiple images together. In this example, the situation was the museum’s arrangement of aircraft was such that it was impossible to get a shot of the entire plane with the lens available at the time. By taking a series of overlapping images while panning the camera, we ended up with four photos covering the entire aircraft. With Photoshop’s image stitching feature, we simply collected the images and let the software . . .
This article costs $2.50 to download - or it's free for AAHS members.
Already a member? Sign in to download for free.